Customize the website to display using Tampermonkey
- Khem Saengkham
- Tampermonkey , Web Programming , Programming
- 17 Jul, 2023
Many people may feel dissatisfied with certain websites when they browse them, for example:
- Disliking intrusive banner advertisements that strain the eyes.
- Wishing a website had specific features, but knowing it might take a long time for those features to be implemented.
- Finding the color scheme of a website unpleasant and uncomfortable for the eyes.
- And so on…
I also feel the same, such as wanting to display a website as a table without images, disliking the background color when giving tips (in reality, not wanting others to know they’re online). They use a tool called “Tampermonkey” to achieve this.
So, what is Tampermonkey?
Tampermonkey is an extension for Chrome that allows users to write and run scripts written in JavaScript on any web page (only affecting the user’s machine). For example, let’s say you open a website and want all the images on that website to appear smaller or replaced with clickable links. You can achieve all of this using this plugin, as if you’re inserting your script and running it directly on that web page (hence the name “Tampermonkey”).
Now, let’s get started with the installation.
First, you need to install the Tampermonkey extension by going to https://chrome.google.com/webstore/category/extensions and searching for “Tampermonkey.” Then, install it.
Once it’s installed, you’ll see it appear in the top-right corner, as shown in the image.
![]()
Let’s start with “Hello world.” It’s simple. Just click on the extension icon, and a menu will pop up. Then, choose “Create a new script…” It will open a new window for you to type in the code.
Now, just copy and paste this code in:
// ==UserScript==
// @name         My Pantip
// @version      1.0
// @match        https://pantip.com/
// ==/UserScript==

(function() {
    'use strict';
    alert('Hello, Pantip');
})()
After that, save by selecting File > Save, or you can press Ctrl + S. Once done, open a new tab and try accessing the Pantip website. If the script is successful, it will display an alert.
Regarding the code above, when creating a script, we need to declare the details of our script (Manifest). In this case, I am using three Tampermonkey directives: @name, @version, and @match. The first two are self-explanatory as they specify the name and version of the script. As for @match, it allows us to define which URLs the script should run on, and we can use pattern matching for this purpose.
If you’re interested in more details, you can check out this link.
Now let’s try doing several things. What I will do is:
- Make the script run only on the thread-viewing page.
- Change the background from purple to something else.
- Modify the website theme from purple tones to pastel colors (emphasizing cuteness).
- Remove the Pantip logo and any irrelevant footer for a smoother appearance.
Number 1 is not too difficult since the Pantip thread page URL is typically be:
Our match code will be:
// @match https://pantip.com/topic/*
Here, for number 2, first, we need to investigate which part controls the background color using the Browser’s Dev Tool or whichever method one prefers. Ultimately, we will find that the purple color is defined in the ‘body’ style. We can easily overwrite it using the command.
$(‘body’).css(‘background’, ‘#fff’)
Many people may wonder why we can use jQuery. The reason is that the Pantip website already includes jQuery for us. In case we want to use jQuery on a website that doesn’t have it by default, we need to import it by adding the necessary code in the Manifest section of our script, like this:
// @require https://code.jquery.com/jquery-3.4.1.min.js
But in this case, we don’t need to do it because the website already provides jQuery for us. So, now I will modify the code to be…
// ==UserScript==
// @name         My Pantip
// @version      1.0
// @match        https://pantip.com/topic/*
// ==/UserScript==

(function() {
    'use strict';
    $('body').css('background', '#fff')
})()
After we save and refresh the webpage, if nothing goes wrong, we will see that the background color of the webpage has changed. Additionally, if we look at the top right corner where the Tampermonkey icon is, we will see the number “1” appearing. This indicates that there is one script running on this webpage.
Alright, next, number 3, which is changing the website theme. In this step, we can use the .css() command to handle each element individually, or there’s another possibly easier method: overriding the webpage’s CSS by writing additional code inside the <head> section.
The approach we will use is something like this:
 $('head').append(`<style>
 /* css code you want to override */
 </style>`);
So, we use append(), which is a command to write a child element (tag) at the end of the desired parent element. In this case, we will write a style tag to override the CSS.
Here, I have already provided part of it, changing to a new color shade. The CSS code I used is as follows:
.samgee .altcolor05 .display-post-wrapper-inner { background: #b2d9ea; }
.samgee .display-post-wrapper-inner { background: #f0c5d5; }
.samgee .display-post-wrapper.main-post { background: #fed797 }
.samgee .display-post-title { color: #333; }
.samgee .main-post .display-post-story { color: #333; }
.samgee .display-post-story { color: #333; }
.samgee .altcolor05 .display-post-story { color: #333; }
.samgee .display-post-number { color: #333; }
.samgee .display-post-tag-wrapper .tag-item { background: #e69288; color: #333; }
.samgee .emotion-vote-list.alt02, .samgee .altcolor05 .display-post-wrapper-inner .emotion-vote-list { background: #e69288; color: #333; }
.samgee .emotion-vote-user a:link, .samgee .emotion-vote-user a:visited { color: #333!important; }
.samgee .emotion-vote-list { background: #e69288; color: #333; }
.samgee .display-post-avatar .display-post-avatar-inner .display-post-name { color: #333; }
.samgee .display-post-avatar .display-post-avatar-inner .display-post-timestamp { color: #333; }
.remark-four-txt { color: #333!important; }
.samgee .pageno-title .title { color: #333; background: #e69288; }
.samgee .main-post .display-post-vote .icon-heart-like, .samgee .main-post .display-post-vote .icon-heart-dislike, .samgee .altcolor05 .display-post-vote .icon-heart-like, .samgee .altcolor05 .display-post-vote .icon-heart-dislike { background: #d7e7a9; }
.samgee .display-post-vote .icon-heart-like, .samgee .display-post-vote .icon-heart-dislike  { background: #d7e7a9; }
.samgee .loadmore-bar-paging a, .samgee .loadmore-bar-paging .loadmore-bar-inner { background-color: #fa6e4f!important; }
.samgee .comment-box-color .display-post-wrapper-inner { background: #feadb9; }
.samgee .display-post-wrapper.comment-box-color input, .samgee .display-post-wrapper.comment-box-color select, .samgee .display-post-wrapper.comment-box-color textarea { background: #f9e1e0;}
.button.letdo-butt span, .button.selected-butt.letdo-butt:hover span { background: #fa6e4f; }
.related-block-title { background-color: #70ae98; }
.related-block-title h3 { color: #333; }
.related-show .related-post-list .post-pick-nothumb { background: #adddce; }
.related-show .related-post-list .post-pick { background: #adddce; }
.samgee .comment-box-remark { background: #70ae98; }
.related-show .related-post-list .post-pick a, .related-show .related-post-list .post-pick-nothumb a, .post-pick-ad a, .post-pick-ad-nothumb a { color: #333; }
.related-show .related-post-list .post-pick .post-pick-by .by-name, .related-show .related-post-list .post-pick-nothumb .post-pick-by .by-name, .related-show .related-post-list .post-pick-ad .post-pick-by .by-name { color: #1500ff; }
.samgee .comment-box-remark .tag-item { color: #333; }
.samgee .comment-box-remark { color: #333; }
Finally, number 4, we will remove the logo and footer, just as before. We simply target them correctly and use the hide() command of jQuery to handle it.
$('.pt-doodle').hide();
$('#jump_paging').hide();
$('.footer').hide();
That’s it, all done! Try refreshing the webpage, and you’ll find our Pantip website looking cute and lovely 😊
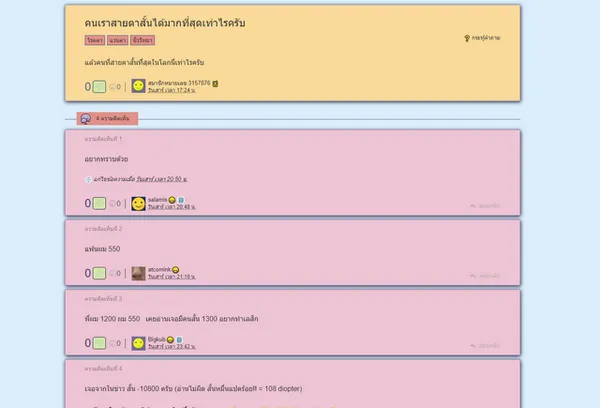
And there you have a simple example of using this plugin.
In reality, this can be utilized to do many other things—it all depends on how creative we are. If anyone wants to have all the scripts mentioned in this article, they can download them all here.